


On Clay, formulas can be found in the side panel when you create a new column AND when you are adding an integration!
Here is a screenshot of the formula panel and where to click for the AI generator.

If you want to see the AI formula creator in action, here’s a quick video of Eric going over it.
Here is a step by step guide for using the AI formula generator:
When you open up a new text column, and click “(Beta) Try AI Formula Creator” the AI formula generator will appear. This will open the prompt for the AI formula generator creation box.
.png)
.png)
When using the AI formula creation prompt, ensure that you are being very specific about what you want to accomplish. The more specific you are, the better the output will be. I like to think of it as explaining instructions to a 5th grader.
When you want to direct the AI to the column you want the formula to be performed on use “/” in order to bring up the dropdown menu of every column in the table. Here’s an example of how to prompt the AI.
Let’s say I have a comma separated list of 3 numbers in Column 1 and I want to separate everything so I’m left with the first number.
.png)
Note that my input was highly specific for the formula.
Separate this column {{"Text Column"}} by the first comma in the string. The result I want is the first number in the string.
I told the AI exactly what column to act on, what action I wanted to perform, and what I wanted the result to be. Often, I see people write the formula the first time with just the first sentence and the AI will give them either the first number or the second two numbers because they never specified what the result was going to look like.
.png)
Also take note that this the formula sample screen. I can either choose to correct the formula, or I can see a sample output of my results and choose that as the correct formula.
This is the correct format so I will save this formula. Click “Output is correct. Save formula.” and then save the settings on your column.
This isn’t the end of the AI usage though. If the formula does not bring you the desired results, you have two options. You can reprompt the AI and try to be more specific, or you can manually change sample data and accomplish what you want to be done and train the AI with your stipulations instead.
Let’s take another example.
.png)
In the example above, I purposely was not specific enough. I want the last word in each string to be my result. All I said was to separate the column by “.”. I didn’t tell it any of the results that I wanted. In this case I can click “Output is wrong.” and move to the next screen.
.png)
In this screen, I have the chance to edit my formula manually and show the AI exactly what I want done. I highlighted the first two words, and deleted them.
.png)
This is me finishing the last edits on the third sample data. After this, I hit “Try generating with expected outputs.”
.png)
Success! I trained the AI and the sample outputs on the new formula is correct. I can now hit “Output is correct. Save formula.” and add the results to my table!
Manually entering formulas
If all of this AI stuff is beginning to overwhelm you, not to worry! There are still ways that formulas can be entered manually! Just ensure that you click the button “Edit as Formula” to get the formula into the correct mode!
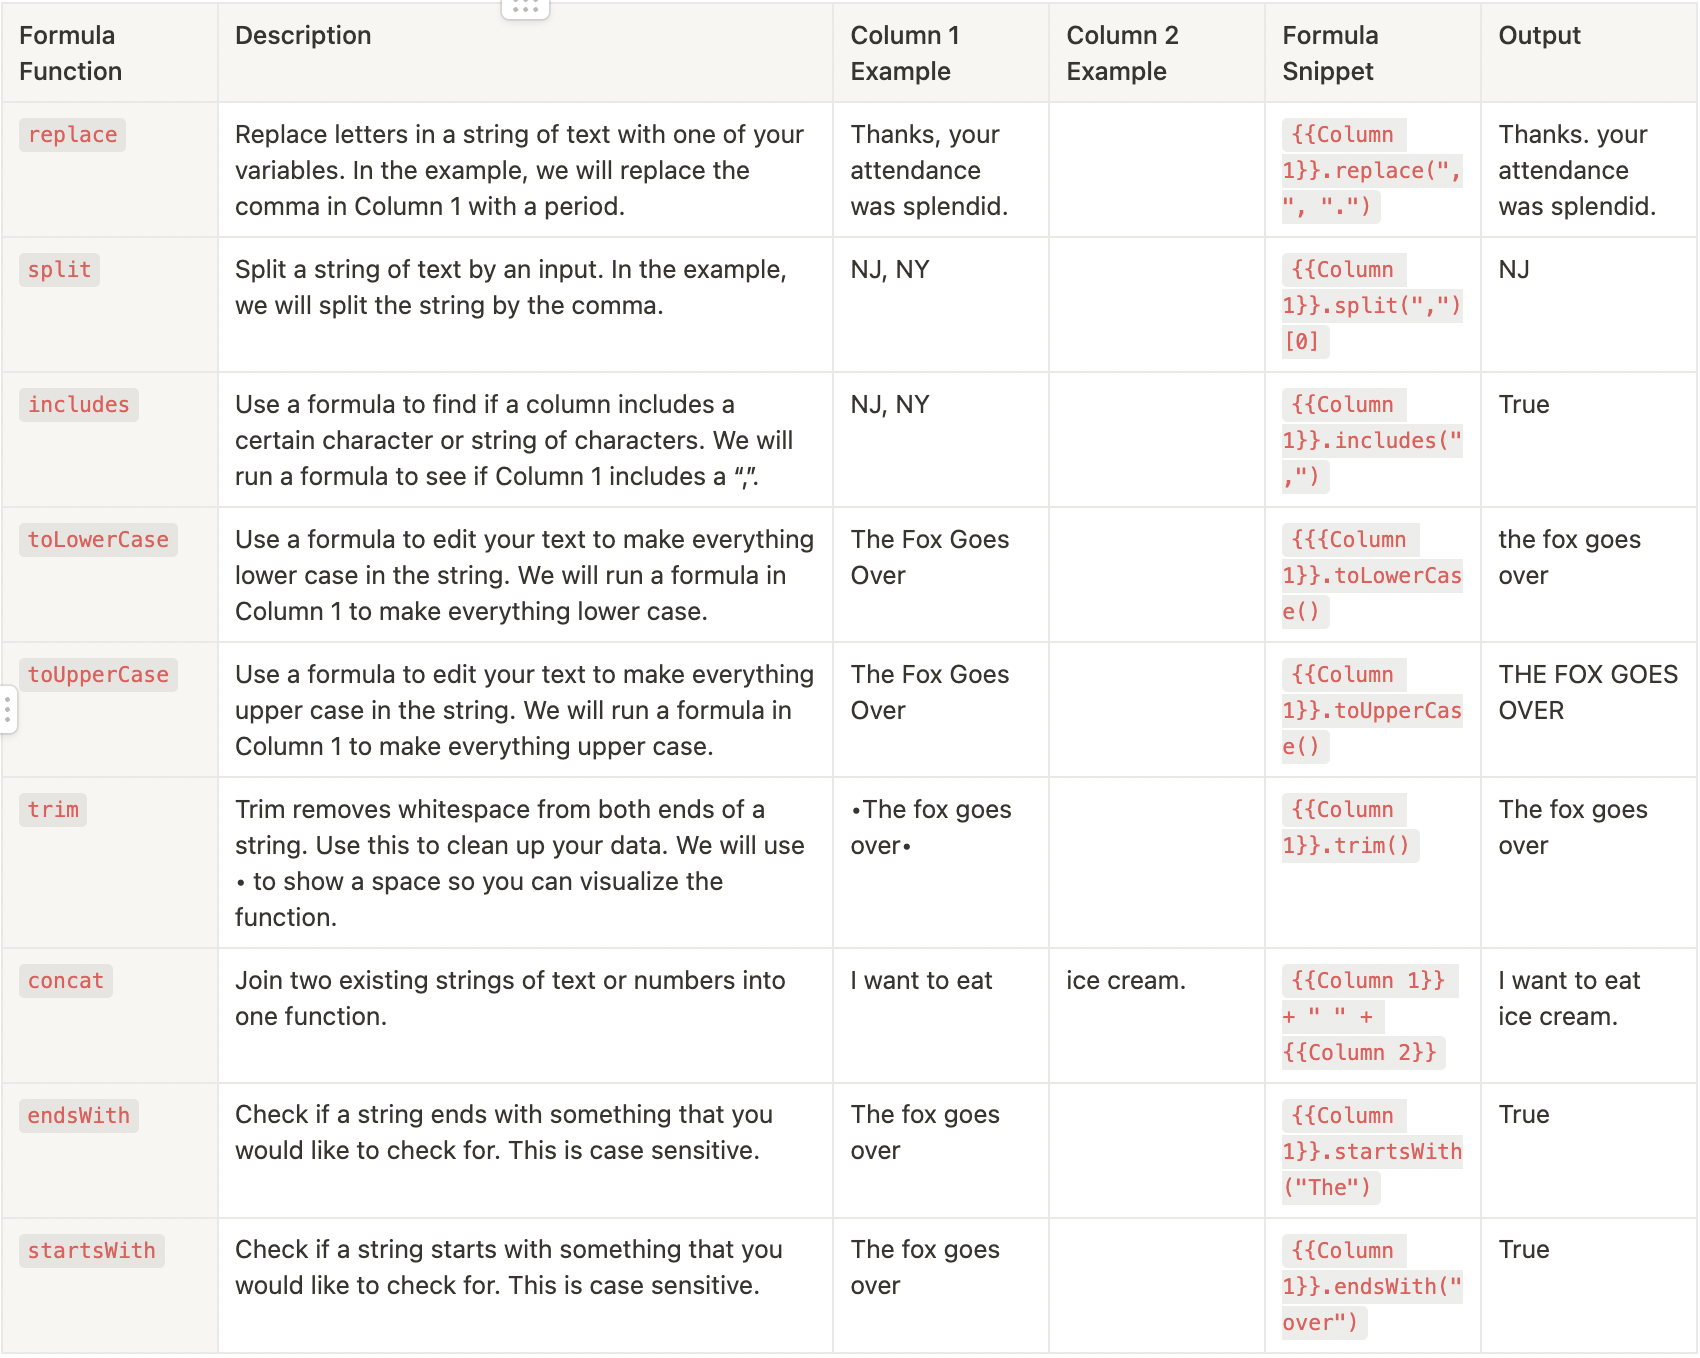
Here’s a quick cheat sheet of formulas that can solve simple tasks for you.
This first table is for simple arithmetic or logical functions.

If you want to see Eric doing this on a video, check it out here!
To use these in Clay, let’s take another example. Open up a new column but instead of clicking into the AI generator, we will click into the Input field. Click “Edit as Formula” to get started.
.png)
.png)
Here we can add the column (this is represented by the token) that we want to use in our formula. Let’s say we want to do the replace formula again because we know that replaces data that we define.
The same way the formula is displayed in the table above, we can replace the data to write our own formula.
.png)
Notice how {{Column 1}} is replaced by {{f_eGriiYMoHXQK}}. This is what the column token looks like when it is shown as a formula. So if you are looking for {{Column 1}} to be neatly displayed, it could show up in your drop down menu when you click into the box, but when you drag or select it, it will come up as the code that is used instead of the column name.
Other than that, everything is the same. We just replace what is in the example table above with our desired inputs and outputs. I wanted to replace “now” with “forever” so I put it in parentheses to make a group and then listed “now” as the string I want to replace and “forever” as the string I want to replace it by.
On Clay, formulas can be found in the side panel when you create a new column AND when you are adding an integration!
Here is a screenshot of the formula panel and where to click for the AI generator.
If you want to see the AI formula creator in action, here’s a quick video of Eric going over it.
Here is a step by step guide for using the AI formula generator:
When you open up a new text column, and click “(Beta) Try AI Formula Creator” the AI formula generator will appear. This will open the prompt for the AI formula generator creation box.
When using the AI formula creation prompt, ensure that you are being very specific about what you want to accomplish. The more specific you are, the better the output will be. I like to think of it as explaining instructions to a 5th grader.
When you want to direct the AI to the column you want the formula to be performed on use “/” in order to bring up the dropdown menu of every column in the table. Here’s an example of how to prompt the AI.
Let’s say I have a comma separated list of 3 numbers in Column 1 and I want to separate everything so I’m left with the first number.
Note that my input was highly specific for the formula.
Separate this column {{"Text Column"}} by the first comma in the string. The result I want is the first number in the string.
I told the AI exactly what column to act on, what action I wanted to perform, and what I wanted the result to be. Often, I see people write the formula the first time with just the first sentence and the AI will give them either the first number or the second two numbers because they never specified what the result was going to look like.
Also take note that this the formula sample screen. I can either choose to correct the formula, or I can see a sample output of my results and choose that as the correct formula.
This is the correct format so I will save this formula. Click “Output is correct. Save formula.” and then save the settings on your column.
This isn’t the end of the AI usage though. If the formula does not bring you the desired results, you have two options. You can reprompt the AI and try to be more specific, or you can manually change sample data and accomplish what you want to be done and train the AI with your stipulations instead.
Let’s take another example.
In the example above, I purposely was not specific enough. I want the last word in each string to be my result. All I said was to separate the column by “.”. I didn’t tell it any of the results that I wanted. In this case I can click “Output is wrong.” and move to the next screen.
In this screen, I have the chance to edit my formula manually and show the AI exactly what I want done. I highlighted the first two words, and deleted them.
This is me finishing the last edits on the third sample data. After this, I hit “Try generating with expected outputs.”
Success! I trained the AI and the sample outputs on the new formula is correct. I can now hit “Output is correct. Save formula.” and add the results to my table!
Manually entering formulas
If all of this AI stuff is beginning to overwhelm you, not to worry! There are still ways that formulas can be entered manually! Just ensure that you click the button “Edit as Formula” to get the formula into the correct mode!
Here’s a quick cheat sheet of formulas that can solve simple tasks for you.
This first table is for simple arithmetic or logical functions.
If you want to see Eric doing this on a video, check it out here!
To use these in Clay, let’s take another example. Open up a new column but instead of clicking into the AI generator, we will click into the Input field. Click “Edit as Formula” to get started.
Here we can add the column (this is represented by the token) that we want to use in our formula. Let’s say we want to do the replace formula again because we know that replaces data that we define.
The same way the formula is displayed in the table above, we can replace the data to write our own formula.
Notice how {{Column 1}} is replaced by {{f_eGriiYMoHXQK}}. This is what the column token looks like when it is shown as a formula. So if you are looking for {{Column 1}} to be neatly displayed, it could show up in your drop down menu when you click into the box, but when you drag or select it, it will come up as the code that is used instead of the column name.
Other than that, everything is the same. We just replace what is in the example table above with our desired inputs and outputs. I wanted to replace “now” with “forever” so I put it in parentheses to make a group and then listed “now” as the string I want to replace and “forever” as the string I want to replace it by.